How to Use
The Keratin Pro-Master Reduction Protocol. A precision two-bottle system with a mandatory oxidative activation step for permanent molecular realignment.
Reduction system · 7 steps · peroxide activation · 230°c flat iron · cpsr compliant
⚠️ Mandatory Activation Step — Please Read Before You Begin
The Keratin Pro-Master system is a reduction system. This means it works in two chemical phases: breaking bonds (Step 1 Reducer) and then locking them (oxidation with hydrogen peroxide). Without the peroxide activation step, the straightening will not hold.
What You Need
Hydrogen peroxide 3% (10 vol) cream developer. Available at any chemist, Boots, Sally Beauty, or professional salon supplier.
Critical Safety
Use ONLY 3% (10 vol). NEVER use 20, 30, or 40 vol — higher concentrations will severely damage the hair.
Order of operations matters: The peroxide is applied AFTER the flat iron, never before. If used before ironing, it locks the hair in its original curly shape — never reverse the order.
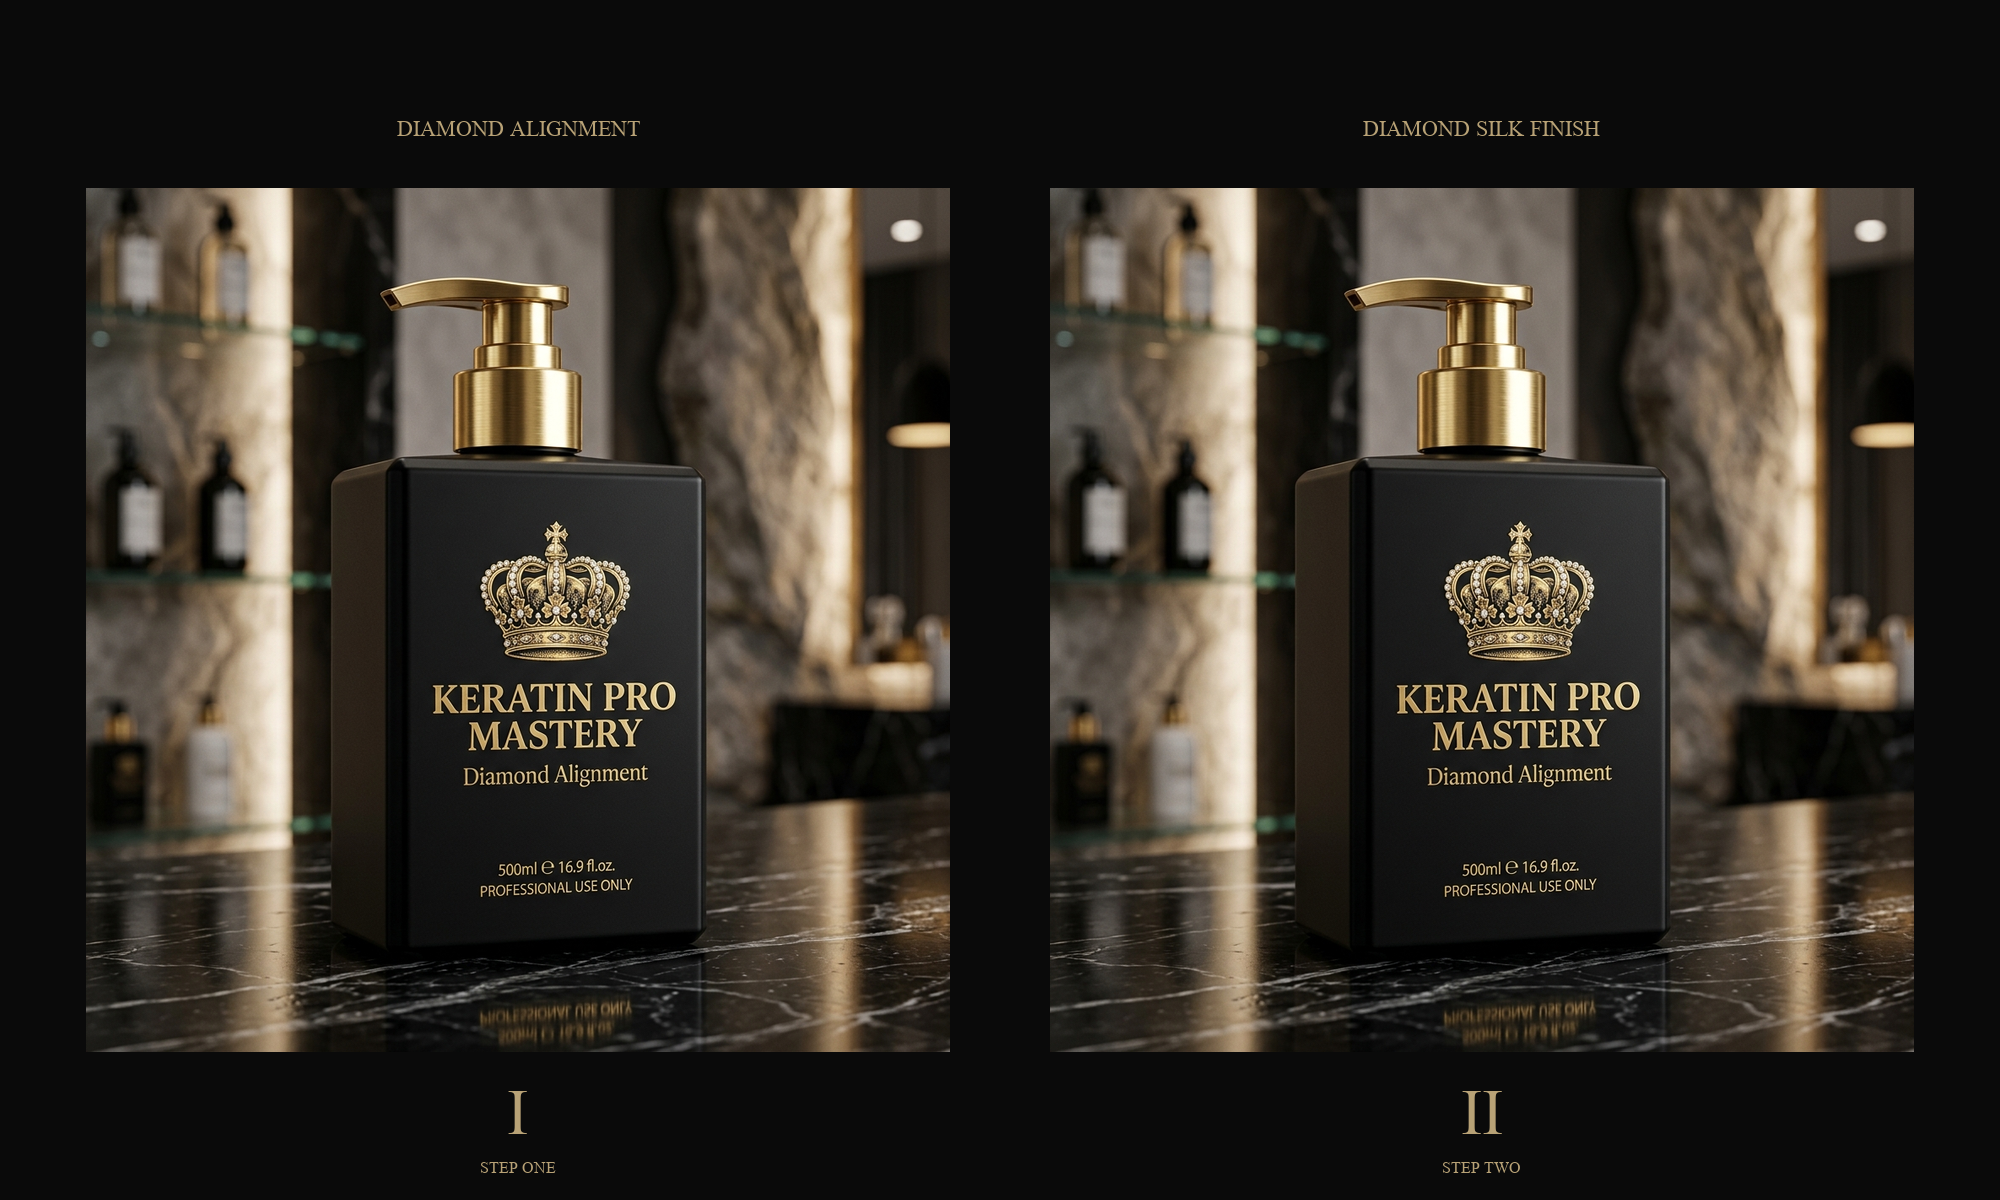
Step 1 (Reducer) & Step 2 (Silk Sealer)
The science that
eradicates frizz.
The Keratin Pro-Master system uses a two-phase reduction-oxidation mechanism. Step 1 (Reducer) breaks the existing disulphide bonds that hold the curl shape. The hair is then blow-dried and flat ironed to physically mould it straight. A 3% hydrogen peroxide developer is then applied to permanently lock the new straight bonds via oxidation. Finally, Step 2 (Diamond Sealer) restores pH balance, seals cuticles flat, and infuses silk proteins for mirror shine.
0% Formaldehyde
Pure organic formula with zero toxic steam, eye irritation, or chemical odours.
Reduction System
Professional-grade bond-breaking and oxidative locking for permanent realignment.
Technical Parameters Matrix
| Fibre Classification | Reducer Time | Flat Iron Temp | Iron Passes | Peroxide 3% |
|---|---|---|---|---|
| Bleached / High Porosity / Sensitive | 20 to 30 minutes | 180°C – 200°C | 8 to 10 slow passes | 5–10 min after iron |
| Normal / Virgin / Medium Wavy | 30 to 40 minutes | 210°C | 8 to 12 slow passes | 5–10 min after iron |
| Coarse / Thick / Resistant Afro (4C) | 40 to 60 minutes | 220°C – 230°C | 10 to 12 slow passes | 5–10 min after iron |
Mandatory Regulatory Safety Note: For chemically compromised or bleached hair, the thermal plastification temperature of keratin is drastically lowered. Flat-ironing above 210°C on highly porous fibres will burn the cuticle. Strictly adhere to the parameters above. The peroxide step (3% / 10 vol only) must always follow the flat iron — never precede it.
The 7 Application Stages
Break → Mould → Lock → Seal. Each stage carries a specific chemical reaction.
Elite Trico-Diagnosis
Thorough hair analysis and biophysical mapping of the fibre before beginning the application.
- Assess elasticity, porosity levels, and history of previous chemical procedures.
- Identify any metallic residues, extreme damage, or incompatible relaxers.
- Conduct a mandatory 48-hour skin/patch test (behind the ear or inner elbow) and a strand test in the nape area to verify resistance.
- Wear gloves. Ensure you are working in a well-ventilated area.
Cuticular Preparation
Controlled opening of the cuticle scales and deep anionic degreasing.
- Wash twice with a deep-cleansing clarifying shampoo (pH 7.5) to strip product buildup, oils, and open cuticles.
- On the second wash, massage gently and leave to act for 3 minutes.
- Rinse thoroughly with lukewarm water.
- Towel-dry to 70–80% moisture (hair should be damp, not dripping). Section hair into four precise quadrants.
Step 1 — Reducer Application
Application of the reduction formula to break and relax the polypeptide keratin chains, preparing them to be moulded into a new straight configuration.
- Apply Step 1 (Reducer) section by section with a tint brush, keeping 0.5 cm clear of the scalp.
- Distribute evenly with a fine-tooth comb from mid-lengths to ends, aligning the hair downwards.
- Fine / Bleached / Sensitive Fibre: Leave for 20 to 30 minutes. Do not let the product dry stiff.
- Medium / Normal / Wavy Fibre: Leave for 30 to 40 minutes.
- Coarse / Resistant / Afro Fibre: Leave for 40 to 60 minutes.
- Rinse out Step 1 completely with lukewarm water.
Thermal Moulding (Blow-Dry & Flat Iron)
Complete blow-drying and molecular shaping under high-precision flat iron heat and tension. This is where the straight shape is physically formed.
- Blow-dry hair 100% dry with a flat paddle brush (directing warm air downwards along the shaft).
- Utilise a professional Titanium flat iron on ultra-thin sections.
- Bleached / Sensitive Fibre: Flat iron at 180°C–200°C with 8 to 10 slow passes under tension (hair pulled taut).
- Normal / Wavy Fibre: Flat iron at 210°C with 8 to 12 slow passes under tension.
- Coarse / Thick / Afro Fibre: Flat iron at 220°C–230°C with 10 to 12 slow passes per section under firm tension.
- The hair must be perfectly straight and smooth after this step — this forms the final shape.
Oxidative Activation — Hydrogen Peroxide 3%
Without this step, the straightening WILL NOT hold. The peroxide locks the new straight bonds permanently. Every salon already stocks this product.
Apply hydrogen peroxide 3% (10 vol) developer over the already-straightened hair to oxidise and permanently lock the new disulphide bonds into the straight configuration.
- Apply the 3% (10 vol) hydrogen peroxide evenly over all sections of the already-straightened hair.
- Leave to process for 5 to 10 minutes — this is the oxidative locking phase.
- CRITICAL: Use ONLY 3% (10 vol) developer. NEVER use 20, 30, or 40 vol — higher concentrations will severely damage the hair.
- CRITICAL: The peroxide is applied AFTER the flat iron, never before. If applied before ironing, it locks the hair in its original curly shape — never reverse the order.
- Rinse out thoroughly with lukewarm water.
- NOTE: The hydrogen peroxide is NOT included in the kit. It is a standard salon staple available from any professional supplier.
Step 2 — Diamond Sealer
Restore fibre equilibrium (pH 4.5), neutralise residual oxidation, and infuse active silk proteins to seal cuticles flat.
- Apply Step 2 Diamond Silk Finish evenly through lengths and ends.
- Massage section by section for 3 to 5 minutes, allowing active ingredients to neutralise and condition.
- Leave for 5 to 10 minutes to lock the cuticles flat and restore the isoelectric point.
- Rinse 100% with lukewarm water.
Luxury Reveal & Styling
Immediate reveal of 3D mirror shine and molecular fluid movement.
- Blow-dry only using warm/cool air and your fingers. Do not use a flat iron at this stage.
- Observe the perfect liquid fall, silk texture, and mirror glow.
- Provide aftercare instructions (recommend sulphate-free, pH-balanced home care).
- Advise client to avoid washing or clipping the hair for 48 hours for complete bond stabilisation.
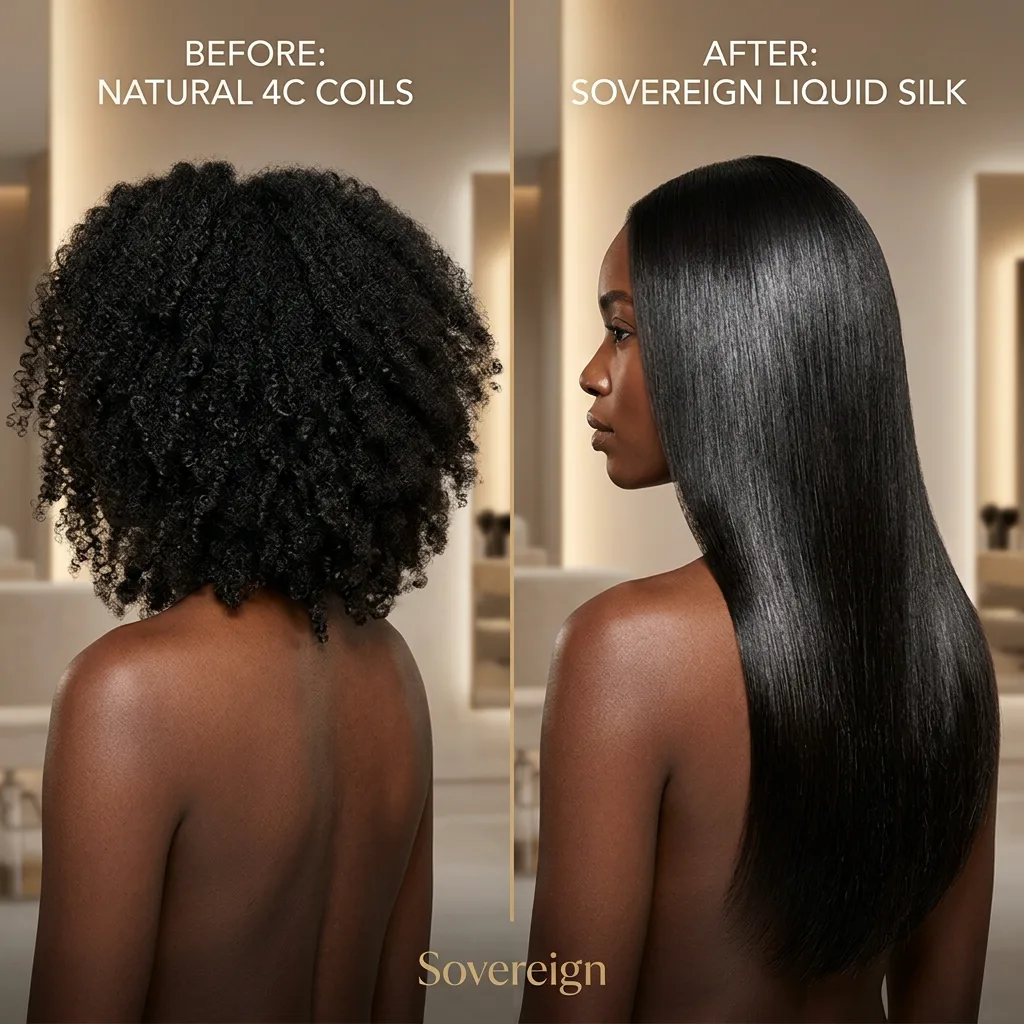
Visual Results
Efficacy on Type 4C Coily Hair
Our reduction-oxidation protocol achieves complete realignment of highly curved 4C coily helices. The reducer breaks existing bonds, the flat iron moulds the straight shape, and the 3% peroxide locks it permanently — all while preserving protein structure, elasticity, and hair health.
Hydrogen Peroxide 3%: Your Questions Answered
Why is peroxide needed?
This is a reduction system. Step 1 (Reducer) breaks the existing curl bonds. The flat iron moulds the hair straight. But without oxidation, those bonds would simply spring back. The 3% hydrogen peroxide permanently locks the new straight bonds via oxidative re-crosslinking. It is the chemical equivalent of setting cement.
Why is it not included in the kit?
Hydrogen peroxide 3% (10 vol) cream developer is a universal salon staple that every professional already stocks in bulk. Including it would significantly increase shipping weight and cost. It is readily available at any chemist (Boots, Superdrug), Sally Beauty, or professional supplier for under £3.
Why ONLY 3% (10 vol)?
3% (10 vol) provides precisely the oxidative strength needed to lock bonds without lifting colour or damaging the hair shaft. Higher concentrations (20, 30, 40 vol) are designed for colour lifting and bleaching — they will cause irreversible protein damage, dryness, and breakage if used with this system.
Why AFTER the flat iron, not before?
The order of operations is critical. The flat iron physically moulds the hair into its new straight shape. The peroxide then locks that shape permanently. If you apply peroxide before ironing, it will re-form the bonds in their original curly configuration — making the treatment completely ineffective. Always: Iron first → Peroxide second.
The Golden Rules of Hair Health
1. Skin Allergy Patch Test
Apply a small droplet of Step 1 behind the ear or inside the elbow. Wait 40 minutes, rinse, and monitor the area for 48 hours. If redness, swelling, or irritation occurs, discontinue use immediately.
2. Nape Strand Test
Isolate a thin strand at the nape of the neck. Apply Step 1, process, rinse, iron, apply peroxide 3%, then Step 2. Check the elastic resistance and colour of the strand. Do not proceed if any chemical breakage or damage is noticed.
3. Colouring Interval
Wait a minimum of 15 days between any permanent colouring or bleaching services and the application of the Keratin Pro-Master system.
4. Protective Equipment
Wear gloves throughout the entire process. Work in a well-ventilated area. While the formula is completely organic and free of formaldehyde fumes, always consult your GP prior to application during pregnancy.
Acquire the Diamond Vault.
Each 1L bottle of the Pro-Master system yields over 15 high-profit applications for luxury salons, or months of glass hair savings for home smoothing. Remember to purchase your 3% (10 vol) developer separately.